June 2024
Using Content layer with Next Js
Streamline the process of handling Markdown (MDX) and other content formats, making it easier and more efficient to build dynamic websites.
- next js
- contentlayer
- web
- blog
This blog post will have topics in
- Introduction to MDX with Next.js?
- Introduction to Contentlayer
- How to implement ContentLayer in Next Js
- And build a simple mdx file with custom Weather component and render it
- Resources
What is MDX
MDX is like to a unique notebook where you may write code and narrative simultaneously. Assume you have a standard notebook in which you jot down thoughts and sketches. Imagine for a moment a magical notebook where you can jot down notes, draw images, and even add little machines (JSX) that may perform various tasks within the notebook, such as displaying buttons, playing games, or watching films!
How Does It Work?
In a regular Markdown file, where you can write texts like this:
# My Story
This is a paragraph in my story.
But with MDX, you can do that and also add JSX.
# My Story
This is a paragraph in my story.

// add a custom button component
<Button>Click Me!</Button>
So, MDX lets you mix normal writing and special code together to make your website pages more exciting and interactive.
Introduction to Contentlayer
It is a powerful content management tool designed to work seamlessly with Next.js applications. It was created by the @schickling & a community with MIT Licenced - A project by Stackbit
It simplifies the process of managing and accessing your content, especially when working with Markdown (MDX) and other content formats. Contentlayer makes your life easier because it has:
- Automatic Content Processing:
- reads your content files (like MDX, Markdown, JSON) from a specified directory.
- automatically processes these files and transforms them into structured data that your Next.js application can easily use.
- Enhanced Developer Workflow:
- You don't need to write complex scripts to parse and load your content. It handles the heavy lifting, allowing you to focus on building your website.
- Unified Data Access:
- provides a unified API to access all your content. This means you can fetch and use your data consistently across your application, whether it's for blog posts, documentation, or other content types.
- Improved Performance:
- By pre-processing your content at build time, Contentlayer helps improve the performance of your Next.js application. It enables static site generation (SSG), ensuring your pages load quickly for users.
- This also enhances your site's SEO, as pre-rendered content is more easily indexed by search engines.
- Flexible Content Modeling:
- Contentlayer allows you to define custom content models, so you can organize your content in a way that best suits your project's needs.
- Whether you're building a blog, a documentation site, or a portfolio, you can tailor the content structure to match your requirements.
- Support for MDX:
- you include React components in your markdown content.
Setting up the Project
1. Creating a New Next.js Project
- Use create-next-app to set up a new Next.js project.
- Provide the command: npx create-next-app my-mdx-blog.
2. Installing Necessary Packages
-
Install next js:
npx create-next-app@latest --typescript --tailwind --experimental-app --eslint example-app -
Provide the installation command:
npm install contentlayer next-contentlayer date-fns. -
Configure The Next.config.js file
const { withContentlayer } = require('next-contentlayer') /\*_ @type {import('next').NextConfig} _/ const nextConfig = { reactStrictMode: true, swcMinify: true } module.exports = withContentlayer(nextConfig) // ^^^^^^^^^^^^ add this to your next.config.js file -
Configure tsconfig.json file (if your using typescript)
// tsconfig.json
{
    "compilerOptions": {
        "baseUrl": ".",
        //  ^^^^^^^^^^^
        "paths": {
        "contentlayer/generated": ["./.contentlayer/generated"]
        // ^^^^^^ location of compiled mdx file going to be stored^^^^^^
        }
    },
    "include": [
        "next-env.d.ts",
        "**/*.ts",
        "**/*.tsx",
        ".next/types/**/*.ts",
        ".contentlayer/generated"
    ]
}
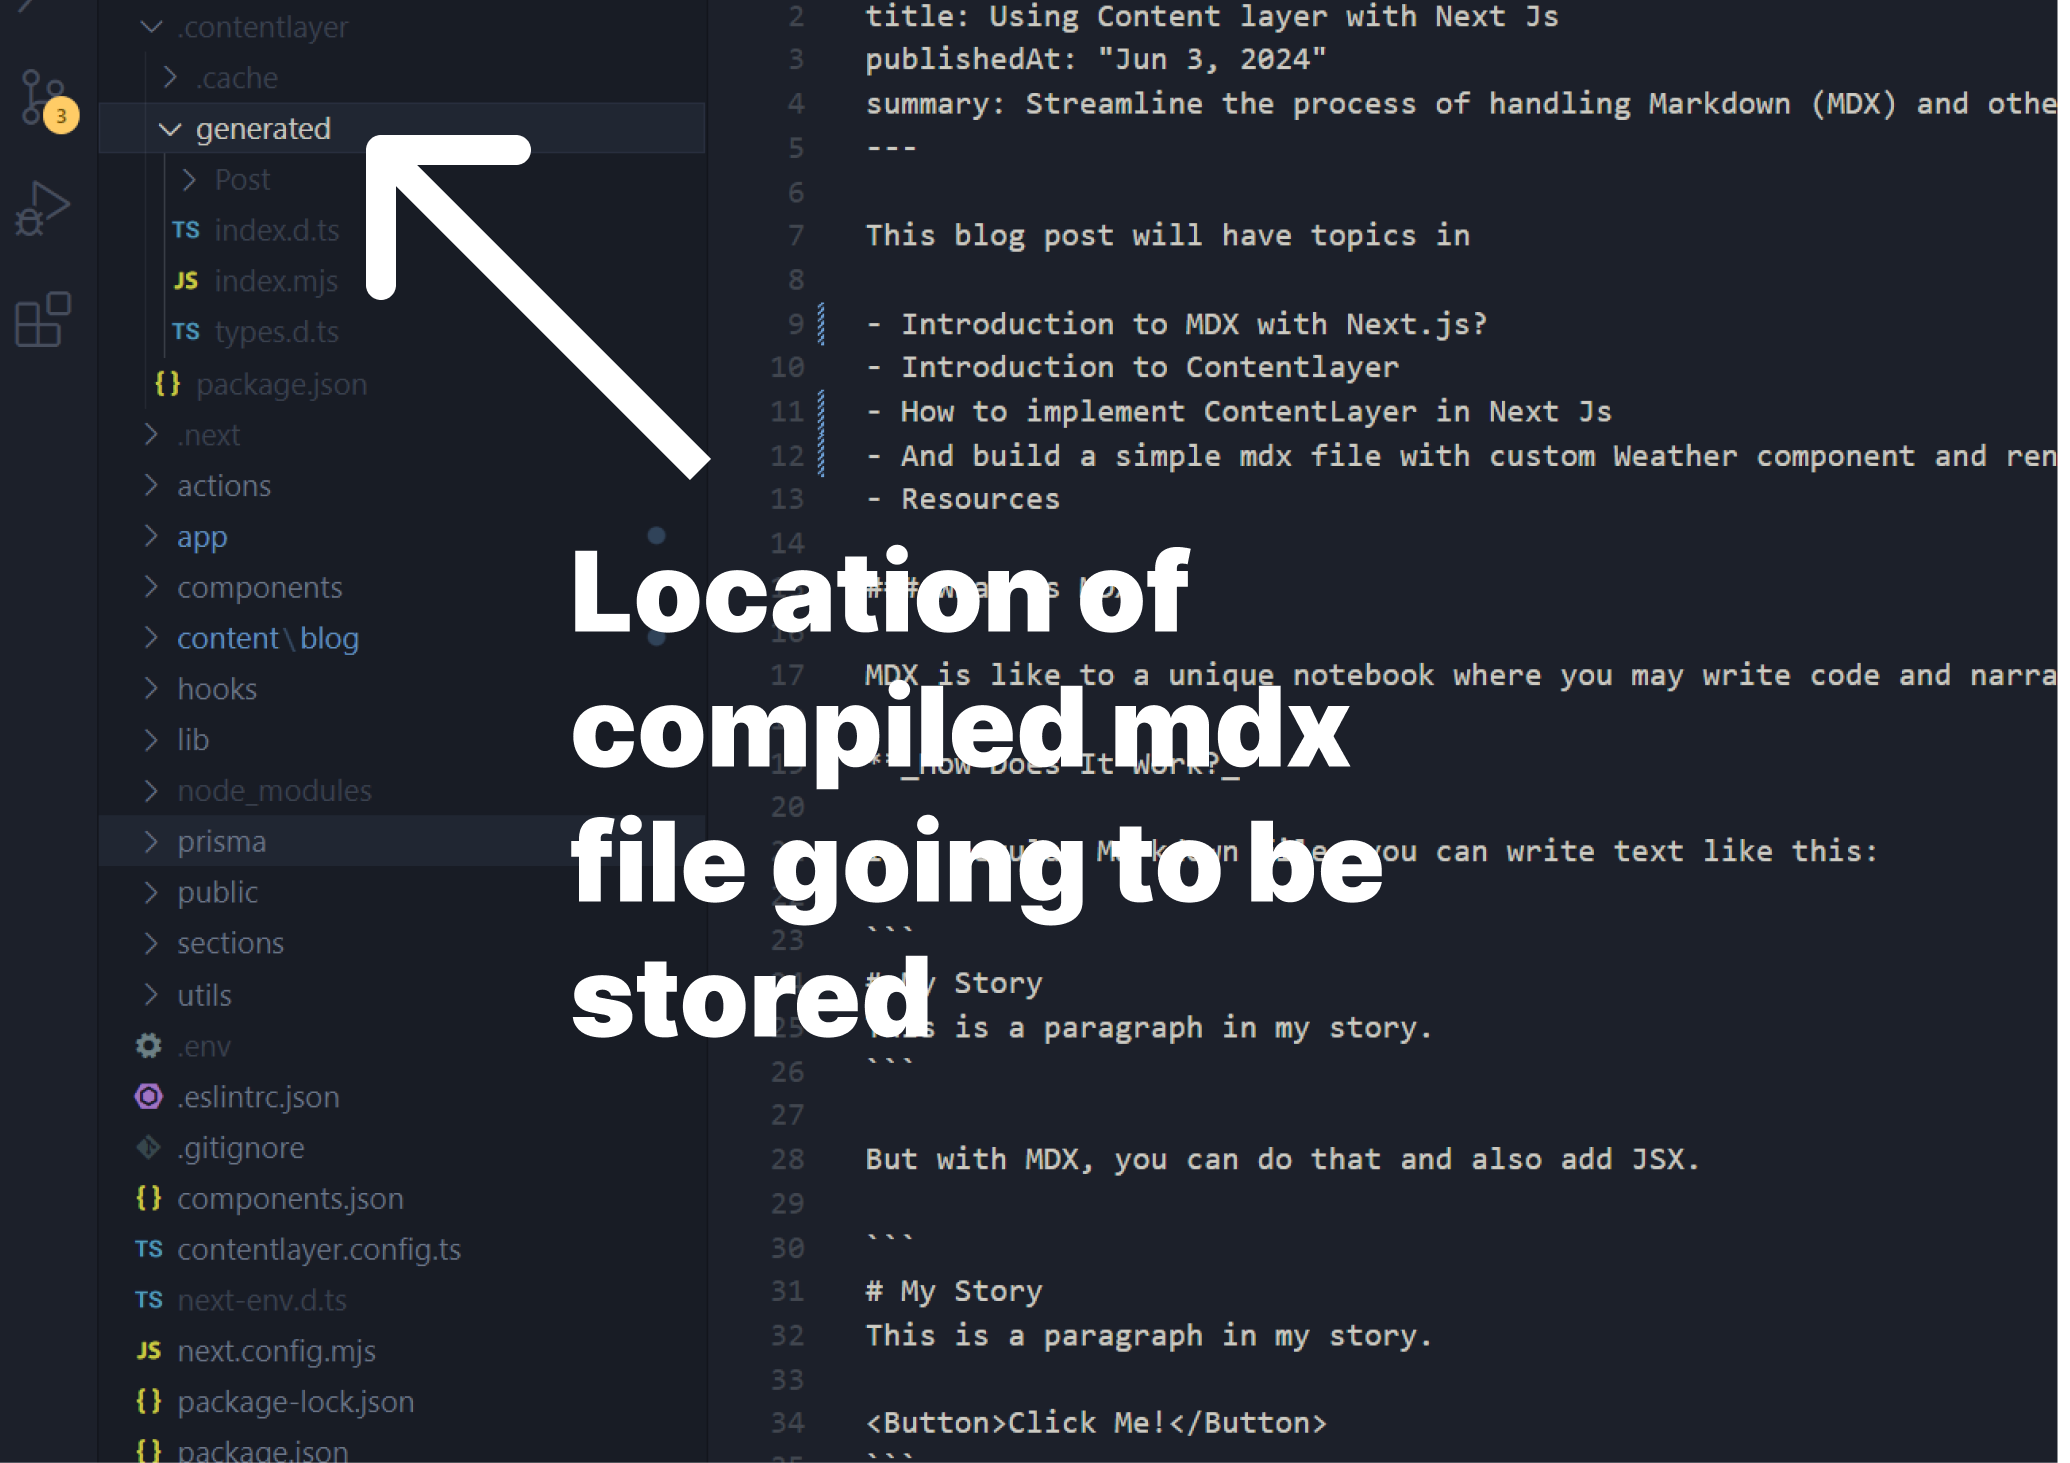
To know where to look for generated files, so its easy to import them later on
-
Create contentlayer.config.ts in the root of your project and add the following content.
    import {
        defineDocumentType,
        makeSource,
        ComputedFields,
    } from "contentlayer/source-files"; // eslint-disable-line
    import rehypePrism from "rehype-prism-plus";
    import rehypeSlug from "rehype-slug";

    const getSlug = (doc: any) => doc._raw.sourceFileName.replace(/\.mdx$/, "");

    const postComputedFields: ComputedFields = {
        slug: {
            type: "string",
            resolve: (doc) => getSlug(doc),
        },
        image: {
            type: "string",
            resolve: (doc) => `/blog/${getSlug(doc)}/image.png`,
            // ^^^^^^ This is where we have all our images, inside the public/blog folder, each mdx file has its own folder
        },
        og: {
            type: "string",
            resolve: (doc) => `/blog/${getSlug(doc)}/image.png`,
            // ^^^^^^ This is where we have all our og images, inside the public/blog folder
        },
    };

    export const Post = defineDocumentType(() => ({
        name: "Post",
        filePathPattern: `blog/**/*.mdx`,
        contentType: "mdx",
        fields: {
            title: { type: "string", required: true },
            summary: { type: "string", required: true },
            publishedAt: { type: "string", required: true },
            updatedAt: { type: "string", required: false },
            tags: { type: "json", required: false },
            featured: { type: "boolean", required: false },
            shortTitle: { type: "string", required: false, default: "" },
        },
        computedFields: postComputedFields,
    }));

    export default makeSource({
        contentDirPath: "content",
        // ^^^^^ this is where the mdx files will be stored that will be compiled on build time
        documentTypes: [Post],
        mdx: {
            rehypePlugins: [rehypePrism, rehypeSlug],
            // ^^^^ plugins to transpile it to JSX. This can be used in react/Vue etc...
        },
    });
3. Creating Content Files
- create a folder called content/blog inside the root project and name it content.mdx
    ---
    title: title of the topic you want to be
    publishedAt: "Month Date, Year"
    summary: Summary or description of the topic you want it to be.
    ---
    {/** mdx content here...

    you can write html elements like this */}

    <div className="w-full h-full  overflow-clip">
        <Image
            width={3000}
            height={1000}
            src={image source}
            alt="image alt"
            className="object-cover"
            layout="responsive"
            sizes="(max-width: 768px) 100vw, (max-width: 1200px) 50vw, 700px"
            loading="lazy"
        />
    </div>

    // Notice am not importing the Image component from next/image
4. Creating a Custom MDX Component
- create a folder components/ui.tsx
"use client"

 import { useState } from "react";

 const ComponentWrapper = () => {
     const [theme, setTheme] = useState("dark")

     // function to change the theme
     const changeTheme = () => {
         if (theme === "dark") {
         setTheme("light");
         } else {
         setTheme("dark");
         }
     };

     return (
         <div className={`w-full h-full mx-auto ${theme === "dark"? "from-gray-900 to-gray-600" : "from-blue-600 to-sky-400"}`} onClick={changeTheme}>
             <h2 className="text-2xl text-center">Component Header</h2>
             <div className="flex justify-between items-center">
                 <div>
                     <p className="m-0">Addis Ababa</p>
                     <p className="text-5xl m-0">21°</p>
                 </div>
                 <div className="text-right text-sm md:text-base">
                     <svg
                         xmlns="http://www.w3 .org/2000/svg"
                         viewBox="0 0 20 20"
                         fill="currentColor"
                         className="w-5 h-5 ml-auto"
                         >
                         <path d="M1 12.5A4.5 4.5 0 005.5 17H15a4 4 0 001.866-7.539 3.504 3.504 0 00-4.504-4.272A4.5 4.5 0 004.06 8.235 4.502 4.502 0 001 12.5z" />
                     </svg>
                     <p className="m-0 mt-2 leading-tight font-medium">mostly sunny</p>
                     <p className="m-0 leading-tight font-medium">H:22° L:19°</p>
                 </div>
             </div>
             <div className="flex justify-between w-full mt-2 md:mt-6">
             {[1, 2, 3, 4, 5, 6].map((number, i) => (
                 <div key={i} className="flex flex-col gap-1 m-0 items-center">
                     <p className="text-xs md:text-sm mb-0 opacity-75">{number}PM</p>
                     {number < 4 ? (
                         <svg
                             xmlns="http://www.w3.org/2000/svg"
                             viewBox="0 0 20 20"
                             fill="currentColor"
                             className="w-5 h-5"
                             >
                             <path d="M1 12.5A4.5 4.5 0 005.5 17H15a4 4 0 001.866-7.539 3.504 3.504 0 00-4.504-4.272A4.5 4.5 0 004.06 8.235 4.502 4.502 0 001 12.5z" />
                         </svg>
                     ) : (
                         <svg
                             xmlns="http://www.w3.org/2000/svg"
                             viewBox="0 0 20 20"
                             fill="currentColor"
                             className="w-5 h-5 text-yellow-400"
                             >
                             <path d="M10 2a.75.75 0 01.75.75v1.5a.75.75 0 01-1.5 0v-1.5A.75.75 0 0110 2zM10 15a.75.75 0 01.75.75v1.5a.75.75 0 01-1.5 0v-1.5A.75.75 0 0110 15zM10 7a3 3 0 100 6 3 3 0 000-6zM15.657 5.404a.75.75 0 10-1.06-1.06l-1.061 1.06a.75.75 0 001.06 1.06l1.06-1.06zM6.464 14.596a.75.75 0 10-1.06-1.06l-1.06 1.06a.75.75 0 001.06 1.06l1.06-1.06zM18 10a.75.75 0 01-.75.75h-1.5a.75.75 0 010-1.5h1.5A.75.75 0 0118 10zM5 10a.75.75 0 01-.75.75h-1.5a.75.75 0 010-1.5h1.5A.75.75 0 015 10zM14.596 15.657a.75.75 0 001.06-1.06l-1.06-1.061a.75.75 0 10-1.06 1.06l1.06 1.06zM5.404 6.464a.75.75 0 001.06-1.06l-1.06-1.06a.75.75 0 10-1.061 1.06l1.06 1.06z" />
                         </svg>
                     )}
                     <p className="text-sm md:text-base m-0 font-medium">67°</p>
                 </div>
             ))}
             </div>
         </div>
     )
 }
You get a component that looks like this
Weather in Addis Ababa
Addis Ababa
21°
mostly sunny
H:22° L:19°
1PM
67°
2PM
67°
3PM
67°
4PM
67°
5PM
67°
6PM
67°
Click the weather to change the background color
5. Finally Add Site Code
- In your root project under blog folder create a page.tsx file and copy this code snippet
    import { Metadata } from "next";
    import { allPosts } from ".contentlayer/generated";
    //^^^^^^^^ Don't worry about this, will be generated on build

    import PostList from "./components/ui/PostList";
    import BlogSection from "@/sections/blog-section/blog-section";

    export const metadata: Metadata = {
    title: "Blog",
    description:
        "This is an awesome blog page!!",
    };

    export default function Blog() {
    const posts = allPosts.sort(
        (a, b) =>
        new Date(b.publishedAt).getTime() - new Date(a.publishedAt).getTime()
    );

    return (
        <>
        <div className="px-6 md:px-6 pt-16 pb-10 md:pt-20 md:pb-14 max-w-[1100px] mx-auto relative">
            <BlogSection posts={posts} />
            <Footer />
        </div>
    );
    }
We use the parent and child component because we are going to separate the server logic and client logic
- In your root project create a section folder and name it a blogSection.tsx file and copy this code snippet
    "use client";

    import PostList from "@/app/blog/components/ui/PostList";
    import type { Post as PostType } from ".contentlayer/generated";
    import { useEffect, useRef, useState } from "react";

    type PostListProps = {
    posts: PostType[];
    };


    export default function PostList({ posts }: PostListProps) {
        return (
            <ul className="flex flex-col justify-between md:flex-row flex-wrap w-full animated-list overflow-hidden">
            {posts.length === 0 && <p>No posts found</p>}
            {posts.map((post) => (
                <Post key={post.slug} post={post} />
            ))}
            </ul>
        );
    }


    const BlogSection = ({ posts }: PostListProps) => {
        const [isLoading, setIsLoading] = useState(true);
        const blogRef = useRef(null);

        useEffect(() => {
            (async () => {
            setTimeout(() => {
                setIsLoading(false);
                window.scrollTo(0, 0);
                // ^^ scrolls to top of the page on page reload (This is optional)
            }, 1000);
            })();
        }, []);

        return (
            <div className="flex flex-col gap-16 md:gap-14" ref={blogRef}>
                <div className="flex flex-col gap-8">
                    <div>
                    <h1 className="animate-in text-4xl md:text-5xl font-bold tracking-tight py-4">
                        Blog
                    </h1>
                    <p
                        className="animate-in text-secondary"
                        style={{ "--index": 1 } as React.CSSProperties}
                    >
                        {posts.length} blog posts about full stack, designs, 3d modeling &
                        animations and more...
                    </p>
                    </div>
                </div>
                <div
                    className="animate-in py-4"
                    style={{ "--index": 2 } as React.CSSProperties}
                >
                    <PostList posts={posts} />
                </div>
            </div>
        );
    };

    export default BlogSection;
- Render the Post component which is going to be under blog/ui/post.tsx
    import { formatDate } from "@/lib/formatdate";
    import type { Post } from ".contentlayer/generated";
    import Link from "@/components/ui/Link";
    import Image from "next/image";

    type PostProps = {
        post: Post;
    };

    export default function Post({ post }: PostProps) {
        const { publishedAt, slug, title, image } = post;
        const publishDate = new Date(publishedAt);
        return (
            <li className="py-3 group transition-opacity md:h-96 w-full md:w-1/2 md:p-2 overflow-hidden">
                <div className="transition-opacity flex">
                    <div className="flex md:flex-col md:justify-between gap-6 w-full h-full">
                    <Link
                        href={`/blog/${slug}`}
                        className="min-w-28 w-36 h-28 md:w-full md:h-60 relative drop-shadow-sm"
                    >
                        <Image
                            src={image}
                            alt={title}
                            fill
                            className="object-cover rounded"
                        />
                    </Link>
                    <section heading={formatDate(publishedAt)}>
                        <Link
                            href={`/blog/${slug}`}
                            className="font-semibold leading-tight text-xl md:text-md"
                        >
                            {title}
                        </Link>
                    </section>
                    </div>
                </div>
            </li>
        );
    }
You may have noticed that you'll get an error when trying to import from contentlayer/generated, its completely Normal. It will work once after running the development server.
Since we have just
Finally Render the blog content dynamically
- Under the blog folder create a dynamic folder blog/[slug]/page.tsx
    import { Suspense } from "react";
    import type { Metadata, ResolvingMetadata } from "next";
    import { allPosts, Post as PostType } from "contentlayer/generated";

    import SingleBlog from "./components/slug";
    import Navigation from "@/components/Navigation";
    import Footer from "@/components/Footer";
    import Link from "next/link";

    type Props = {
    params: {
        slug: string;
        id: string;
    };
    searchParams: { [key: string]: string | string[] | undefined };
    };

    export async function generateMetadata(
    { params, searchParams }: Props,
    parent: ResolvingMetadata
    ): Promise<Metadata> {
    const post = allPosts.find((post) => post.slug === params.slug);

    if (!post) {
        throw new Error("Post not found");
    }

    const {
        title,
        publishedAt: publishedTime,
        summary: description,
        image,
        slug,
    } = post;

    const metadata: Metadata = {
        title: `${title}`,
        description,
        openGraph: {

        description,
        type: "article",
        publishedTime,
    };

        return metadata;
    }

    export default async function Post({ params }: { params: any }) {
        const post = allPosts.find((post) => post.slug === params.slug);

        return (
            <Suspense>
                <div className="flex flex-col gap-10 max-w-[700px] lg:max-w-[1000px] mx-auto md:gap-14">
                    <SingleBlog post={post} />
                    {/* ^^^ child component to pass post props */}
                </div>
            </Suspense>
        );
    }
- Under the blog folder create a dynamic folder blog/[slug]/components/slug.tsx
   "use client";

    import Image from "next/image";
    import { formatDate } from "lib/formatdate";

    import Mdx from "@/app/blog/components/ui/MdxWrapper";
    import { useEffect, useState } from "react";

    import { notFound } from "next/navigation";


    const SingleBlog = ({ post }: any) => {
        const [isLoading, setIsLoading] = useState(true);
        const [mounted, setMounted] = useState(false);

        useEffect(() => {
        (async () => {

            setTimeout(() => {
                setIsLoading(false);
                window.scrollTo(0, 0);
                //^^ scroll to top position(optional)
            }, 1000);
            })();

        }, []);

        useEffect(() => {
            setMounted(true);
        }, []);

        if (!mounted) {
            return null;
        }
        // ^^ for hydration purposes

        if (!post) {
            notFound();
        }

        return (
            <article className="mt-10 w-full h-full px-2 md:px-10">
                <div
                    className="flex animate-in flex-col gap-8"
                    style={{ "--index": 1 } as React.CSSProperties}
                >
                    <div className="space-y-4">
                        <h1 className="text-3xl lg:text-4xl font-bold leading-tight tracking-tight text-primary">
                            {post.title}
                        </h1>
                        <p className="text-lg leading-tight text-secondary md:text-xl">
                            {post.summary}
                        </p>
                    </div>

                    <div className="flex max-w-full items-center gap-4  justify-between">
                    <div className="leading-tight">
                        <p className="font-medium text-primary">Milkias Hailu</p>
                        <p className="text-secondary">
                        <time dateTime={post.publishedAt}>
                            {formatDate(post.publishedAt)}
                        </time>
                        {post.updatedAt ? `(Updated ${formatDate(post.updatedAt)})` : ""}
                        {" · "}
                        </p>
                    </div>
                    </div>
                </div>

                {post.image && (
                    <>
                    <div className="h-8" />
                        <Image
                            src={post.image}
                            alt={`${post.title} post image`}
                            width={700}
                            height={350}
                            className="max-w-full h-full animate-in mx-auto"
                            style={{ "--index": 2 } as React.CSSProperties}
                            priority
                            quality={100}
                            layout="responsive" // Ensure the image scales with the size of the container
                            sizes="(max-width: 768px) 100vw, (max-width: 1200px) 50vw, 700px" //
                        />
                    </>
                )}

                <div className="h-16" />
                    <div
                        className="prose prose-neutral animate-in max-w-full"
                        style={{ "--index": 3 } as React.CSSProperties}
                    >
                    <Mdx code={post.body.code} />
                    //^^ Mdc component to render
                </div>
            </article>

        );
    };

export default SingleBlog;
And with that You have successfully Rendered Your First Blog page, Way to go!